Introduction to SDCC and Fusion-C
- May 26, 2023
- 10 min read
Updated: Jul 27, 2023
What is sdcc? And Fusion-C?
Sdcc is a cross-compiler that allows us to program on our PC (Linux, Windows, and Mac) and obtain a binary that can be executed on our MSX (and other platforms that have the Z80, like the Spectrum, CPC, etc., but we are not so interested in those). This allows us to use modern editors to develop for our machines from the past century.
Fusion-C is an open-source library developed with sdcc that has many functions that allow us to use the capabilities of the MSX in a simple way. As of 03/05/2023, version 1.2 can be downloaded from the Repro-Factory website (https://www.ebsoft.fr/shop/) in the Fusion-C section by downloading Fusion-C Tools and Fusion-C Library, which are completely free. You just need to register.

Once we have made the purchase (check out) of the product, we need to go to our account and go to the orders to click on the download link:


The file MSX_Fusion-C-V1.2.zip contains the C library and the document FUSION-C-Quick A4 1.2.pdf, which explains the installation process. In the Fusion-C_ToolsChain.zip file, we find the hex2bin program for conversion to binary, the openMSX emulator, sdcc 3.6, and the configuration to make it work with the Sublime editor.
What do we need to develop our programs?
An editor
Any software that allows us to edit a text file will be sufficient to write the C code for our application. Personally, I use Emacs, one of the oldest editors, with the Spacemacs layers. Another member of the MoltSXalats group uses Visual Studio. This editor is explained in the Fusion-C book and has compilation and execution integrated with openMSX.
The sdcc compiler
You can download the compiler for different versions and platforms here. Be very careful to download the version that corresponds to your platform (Linux, Windows, Mac) and that matches the version used to compile Fusion-C. For example, version 1.2 requires sdcc 3.6.
To compile our program, we will use the following command:
sdcc -V --code-loc 0x106 --data-loc 0x0 --disable-warning 196 -mz80 --no-std-crt0 --opt-code-size fusion-DOS.lib -L ./fusion-c/lib/ -I ./fusion-c/include/ ./fusion-c/lib/crt0_msxdos.rel {filename}What do all these parameters mean? Let's explain their meaning:
-V is used to indicate that we want verbose mode, which provides more information on what it's doing.
--code-loc 0x106 indicates from which memory address the binary will be loaded when we execute the obtained .com file. In this case, it's address 106, as address 100 is where the program code starts in the DOS system (Figure 3.1 https://konamiman.github.io/MSX2-Technical-Handbook/md/Chapter3.html), and the following 6 bytes are variables used for the return of our program to DOS, which uses the crt0.
--data-loc 0x0 is the space we want to leave between the code and the variables generated by the compiler. To make the file more compact, we place the variables immediately after the code, hence the 0.
--disable-warning 196 is used to suppress warnings related to warning 196='pointer target lost const qualifier', which appears with printf functions.
-mz80 indicates that it should compile to generate binary code (opcodes) for the z80 processor.
--no-std-crt0 is used to indicate that we won't be using the default crt0 from the sdcc library, but our own. This crt0 is the initial part that we have left, so we start at 0x106. More information about crt0 can be found here from konamiman or here explained by Avelino Herrera (I don't know which one is the original). There are different crt0 files depending on whether the binary we want to execute is intended to be run from Basic, DOS or DOS with parameters.
--opt-code-size is used if we want the compiler to optimize for size reduction. If we want to increase speed, we use the other parameter, --opt-code-speed.
fusion-DOS.lib -L ./fusion-c/lib/ we also need to indicate the different libraries we use, in this case fusion-DOS.lib and the path where we will find it, ./fusion-c/lib, after the -L parameter.
-I ./fusion-c/include/ we shouldn't forget about the includes that have been specified inside the C file to be compiled. We also need to indicate where the compiler can find them with the -I parameter.
./fusion-c/lib/crt0_msxdos.rel this is the crt0 we want to use in this compilation.
{filename} finally, the name of the file containing the C code to be compiled.
Delete the functions printf, sprintf, vprintf, putchar, and getchar
The sdcc library that contains the commands of the C standard (for, if, int, etc.) also includes the functions fprintf, sprintf, vprintf, putchar, and getchar, but these are not ideal for our MSX, as indicated on page 25 of the FUSION-C-Quick A4 1.2.pdf file found in the downloaded .zip from the Fusion-C website. For Linux, the following steps need to be taken (for other platforms, refer to the Fusion-C-Quick document):
sudo sdar -d /usr/share/sdcc/lib/z80/z80.lib vprintf.rel; sudo sdar -d /usr/share/sdcc/lib/z80/z80.lib getchar.rel; sudo sdar -d /usr/share/sdcc/lib/z80/z80.lib putchar.rel; sudo sdar -d /usr/share/sdcc/lib/z80/z80.lib sprintf.rel, sudo sdar -d /usr/share/sdcc/lib/z80/z80.lib printf.rel
The path /usr/share/sdcc/lib/z80/z80.lib is where the z80.lib library is located according to the package installed by the OpenSUSE distribution. Other distributions use different paths. You can perform a search with sudo find / -name "z80.lib". The sdar command is included in sdcc and is used to manage libraries. A library is nothing more than a collection of .rel files. .rel files are binary files obtained with sdcc. With the sdar -d command, we are removing these files from the z80 library. So when it needs to be linked, it will use the Fusion-C functions.
MSX Binary Translator
The resulting binary from the compilation is not in MSX format, it is in Intel Hexadecimal format. To perform the translation, we will use the hex2bin program. It is already included in the Fusion-C utilities downloaded from repro-factory. Unfortunately, the Linux version didn't work for me, so I downloaded it from sourceforge.
The command we will use is:
hex2bin -e output_file.bin input_file.ihxThe -e parameter is the name we will give to the output file extension once it has been converted to MSX code, in this case, com. The last parameter is the name of the file with the .ihx extension that we obtained when compiling with sdcc.
The openMSX emulator
To test the code without leaving the development platform, we will use the open-source openMSX emulator. There are other emulators, but this one is open-source and still receives updates. In addition, it has a debugger with very good features.
To install openMSX, you can refer to this video tutorial or follow the instructions in the official documentation.
The command to run the emulator is:
openmsx -machine Panasonic_FS-A1ST -diska path_to_our_virtual_disk/With the -machine parameter, we indicate the MSX machine we want to emulate, in this case, a Turbo-R. Remember that you can emulate different machines if you have the corresponding ROMs and their XML description in the machines directory. The filename of this XML file should come after the -machine parameter.
The second parameter, -diska, is used to specify that the disk drive is virtual and can read files from the path specified as path_to_our_virtual_disk/. All files placed in this directory will be seen by the emulated MSX. If you use the dir command, you will see them. Any changes made to the directory are immediately reflected in the emulator, and vice versa, in the directory. This means that if you create a file in the emulated MSX and save it in what would be the MSX disk, it will immediately appear in the specified directory on the platform where the emulator is running. There is no need to reset the MSX to see the changes. This way, you can keep the emulator running while continually modifying your .COM file. The only limitation is that the files in this directory cannot exceed 720K (the capacity emulated by the disk drive).
If you prefer a graphical environment to run openMSX, you can use Catapult (available for download on the openMSX website. However, remember to specify that the disk drive is a directory on your computer.
On the same website, you will find a link to download the debugger. It doesn't require any parameters to run.
First C program
To test everything explained above, you can create this C file:

Block B1 is where we indicate all the .h files where the function definitions we will use are located, in our case: Screen, Cls, Locate, etc.
Next is the main function, which is executed when the file is compiled. In Block B2, we indicate that it should set the screen to 0 and clear it. Then (in B3), we specify that the write position is (10,10), and at this coordinate, we will write the text "El meu primer programa en C!" (My first C program!). We will wait for a key to be pressed to continue. Finally, we will exit the program and return to DOS in Block B4.
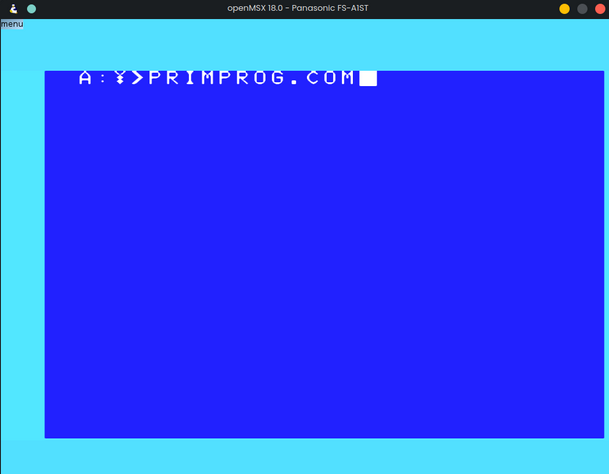
If we name this file PrimProg.c, we can compile it using the command mentioned in the section "The sdcc compiler" by replacing {filename} with PrimProg.c.
From all the generated files, we will take PrimProg.ihx and convert it to binary using the hex2bin command, where nom_fitxer.ihx will be PrimProg.ihx. With this, we will have the PrimProg.com file, which we will copy to the directory specified by the dska parameter when running openMSX. This is what we will obtain.


But what are all these generated files?
The sdcc compiler generates many files in addition to the .ihx file. Let me explain each of them:
.asm: It is the first file generated by the compiler, which takes each line of code and translates it into assembly language. It also creates sections for variables (data) and code.
.sym: This file lists all the symbols (variables) and functions used in the .asm file.
.rel: It is the compiled file with opcodes, which is the translation of the .asm file into hexadecimal code understood by the Z80 processor. If we want to create a library or link to another .c file, this is the file that we need to add to the sdcc command.
.lst: This file combines the previous three files. For each line of code, you can find its translation in assembly language, and each assembly line corresponds to its Z80 opcode and the number of bytes it occupies. Here is an excerpt from our PrimProg.lst file:
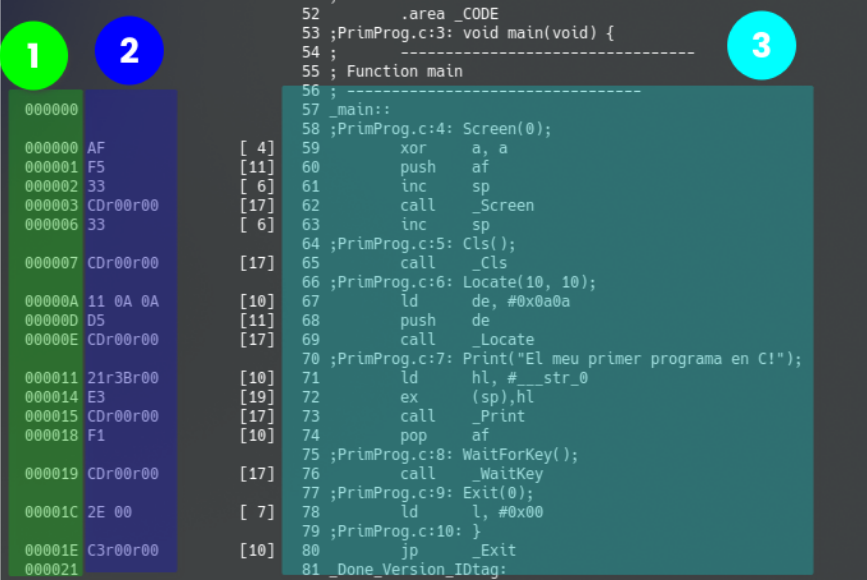
Zone 1 represents the size of the instruction in hexadecimal, zone 2 represents the opcode (machine code) for the Z80 processor, and zone 3 represents the translation for each command in our code. For example, if we look at line 58, 58 ;PrimProg.c:4: Screen(0);, it indicates that on line 4 of our program, there is the function Screen(0), and in the following lines (59-63), we can see the translation of this line into assembly language. In part 2, corresponding to each line, we have its opcode.
.lk: This file lists the data required by the linker to link our binary (.rel) with other binaries from the libraries we have used.
.noi: It contains the definitions of different functions and variables. I suppose the linker uses it.
.map: The part we are interested in is the _CODE section, where we find all the functions from the .lst file, but with their respective memory positions in the MSX. For the previous program, we obtain:
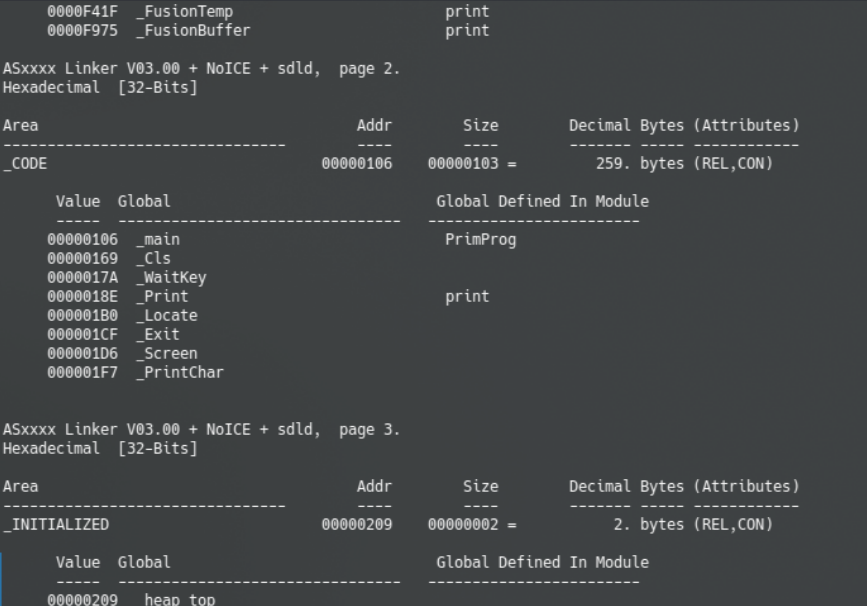
Where we can observe that our main function is located at memory position 106.
The debugger
The .map and .lst files allow us to debug our code if something unexpected occurs. Let's see how the debugger works in our first program. In the case of Linux, we will invoke it as openmsx-debugger, and an application window will open, as shown below:

The first time we run it, we need to click on the horizontal lightning bolt to connect it to an openMSX emulator that is running. If there is only one emulator instance, it will connect automatically, but if there are multiple instances, we will have to choose which one to connect to. We can click on the pause icon (two vertical bars) to see which emulator has been paused. Once connected, we will see that the different parts of the screen fill with data according to the values of the memory and registers of openMSX. It's important to note that these values are only updated when the debugger is in the breakpoint state (indicated by the red circle icon). To continue emulation, we can click on the adjacent icon, the blue running person. If we set a breakpoint at address 0x106 by clicking the Add button in the Debug list section and entering $106 (hexadecimal addresses are preceded by $ in the debugger), and then run our program, we will get the following result:

And we observe that the emulation is paused at address 0x106 where the OpCode is xor a,a, and if we look at the listing file (.lst), it matches the first line of the main function. Furthermore, the consecutive instructions are also the same opcodes as we have in the .lst file.
Would it be possible to have the lines of code visible in the debugger?
Yes, it is possible to have the code lines visible in the debugger. There is a direct relationship between the commands in the .lst file and the code in the debugger. It would be helpful to understand which line of our code is being debugged without having to refer to the .lst file.
The debugger allows us to create labels for different memory addresses. To do this, we need to go to System and select the Symbol Manager option. In the Address labels tab, we can click the Add button to create a text label that will appear in the code section of the debugger. For example, let's create the label "Prova_JBD" for the address 0x79F0:

The openMSX debugger has an option to load all these symbols from a file. Would it be possible to translate the information from the .lst file to create a symbol file that the debugger can interpret? The script create_sym_debug.py (it can be found in gitlab) allows us to perform this translation. We just need to run it as follows: python3 create_sym_debug.py {ProgName}, where {ProgName} is the name of the compiled file without the .c extension. In our case, it would be python3 create_sym_debug.py PrimProg, and it will generate the file PrimProg_opmdeb.sym. We can import this file into the debugger by going to the System menu, selecting the Symbol Manager option, and then the Symbol files tab. Clicking the Add button allows us to navigate through the computer files and find the PrimProg_opmdeb.sym file. After loading it by clicking the Reload all button, we will have the C code labels within the memory mapping of the debugger:

Conclusions
In this article, we have explained the operation of sdcc and the Fusion-C library. We have described the different commands to use for compilation and how to set up an environment for C code development and exporting it to an MSX. We have also explained the debugger and the relationship between memory and the files generated by sdcc.
These are the foundations to start experimenting with C and see how it works on the MSX.
Postscript
It is also possible to download a more updated version of Fusion-C from Eric Boez's GitHub repository, which is version 1.3. However, this version has been abandoned in favor of version 2.0, which we hope will be released soon.


Comments