OPL4 - Wave
- Feb 9, 2025
- 16 min read
Updated: Apr 27, 2025

Introduction
In the post Programming OPL4 (FM Part) we explained what the Moonsound is and how to program the FM part of the chip. In this article, we will discuss the other part, the wave part of the chip. First, we will talk about its registers and see how to load a sound created by us. Then, we will examine how the instruments are organized in the Moonsound of the YRW801 chip. Finally, we will implement this knowledge in a C program.
Wave part of the OPL4
Compared to all the parameters in the FM part, the wave part is much simpler.
The Moonsound allows up to 24 channels to play wave sounds simultaneously, which can also be mixed with FM sounds.
What is a wave signal?
A wave signal is a graphical representation of a sound or electrical signal that varies over time. In the context of digital audio, a wave signal is used to represent digital sound samples. These samples are numerical values captured at regular intervals from an analog sound wave and converted into digital data through a process called sampling.
Today, there are many programs capable of sampling/digitizing sound. The program I used is audacity which is open-source. Using it, I generated a .wav signal that I loaded into the Moonsound and played back.
How do we record an audio with Audacity?
The steps to record a simple audio that can be uploaded to Moonsound are as follows:
Open the program and click the record button.

This will make the application start sampling from the microphone on the computer. To stop, simply click the button with a square.
After recording, we can see the waveform of our audio.

Here, we can edit the audio to trim, add effects, etc.
The recorded signal is in stereo, and Moonsound is mono; we only need the information from one channel. That’s why we eliminate one of the two channels as follows: first, we separate the tracks by clicking “Split Stereo Track”:

Then, click the “x” on one of the channels to delete it:

Once editing is finished, we need to export our signal. Moonsound supports 8, 12, and 16-bit sounds with a sign. The 12-bit format is outdated. I tried various software to transfer the 12-bit YRW801 data but couldn’t find any. After many attempts to extract the data, when I finally figured out how it worked, I discovered that in Furnace, right-clicking the folder to open instruments in the samples tab allows importing a variety of formats, including 12-bit. Returning to Audacity, it allows exporting in 8-bit unsigned or 16-bit signed. In the example used in this article, it is 8-bit unsigned, as it takes up less memory than the 16-bit version, although it has lower quality.
Audacity records in many formats, including WAV, which adds a 44-byte header, and the rest are raw untransformed samples. To remove this header, we can use a hexadecimal editor like Okteta or run the following command in Linux, where "if" is the input file name and "of" is the output file name:
dd if=audio.wav of=audio_no_header.raw bs=44 skip=1If you leave the header, nothing happens, but there will be a bit of distortion at the beginning of playback. However, since it’s only a few bytes, it won’t be noticeable.
Programming the OPL4 wave part
Unlike the FM part, which has two almost identical banks of registers to configure all the channels, here, with just one bank, we can configure all 24 channels. In the following diagram from Yamaha's documentation, all the registers for the wave part are represented:
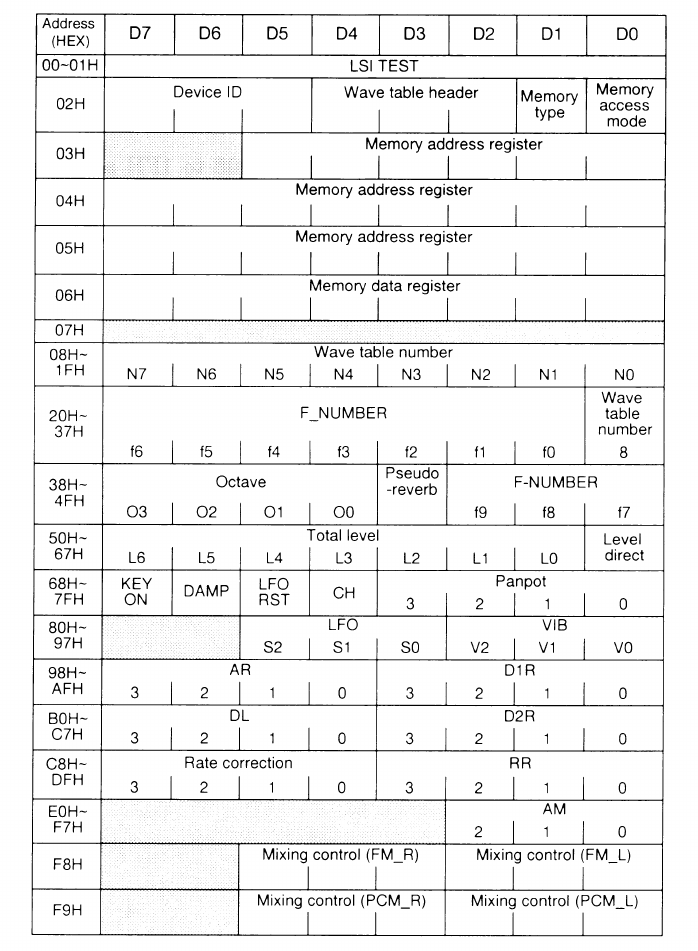
The first important register is 0x02, which is for configuration. In the case of Moonsound, bits 7-1 are always the same, and bit 0 is activated to write the samples from the MSX memory to the Moonsound. Bits D4-D2 specify the memory architecture where the samples are stored. For Moonsound, this should be set to 0b100, which is the configuration where the first 384 samples are located at address 0x0 and are read from the YRW801, a Yamaha chip that contains 12-bit samples following the MIDI1 standard. The remaining 128 samples can be loaded from the MSX starting at address 0x200000. In the DalSoRi R2 device, there is a switch that allows configuring it without using the YRW801, thus making the entire memory space (512 samples) available to the user.
Registers 0x03-0x05 indicate the Moonsound memory address where the data stored in register 0x06 will be written.
From here, all registers go in blocks of 24, where each register in each block allows us to configure each of the 24 wave channels that the Moonsound can play simultaneously. The offset that indicates the channel number must be maintained to stay consistent with the entire configuration. In other words, if I want to configure channel 4, I will need to modify registers 0x08+4, 0x20+4, 0x30+4, ..., 0xE0+4.
The first block (0x08-0x1F) is used to select which sample is to be played. The maximum number of samples is 2^9 = 512. Each of these 1024 samples can be 2^16 = 65536 bytes in size. Depending on the configuration set in register 0x02, we will need to define the samples at one memory location or another. In the case of Moonsound, the first 384 instruments are read from the YRW801, and the others start at address 0x200000.
I would also like to highlight that, unlike the FM part, the Wave part has 4 bits to determine the octave (registers 0x38-0x4F). This fourth bit is the sign of the two’s complement of the block. Two’s complement is a way of representing negative numbers in binary, with the advantage that if I sum two binary numbers expressed in two’s complement, the result is correct. For example, -4 + 3 = -1. In two’s complement binary, -4 is represented as 0b1100, positive numbers are represented as normal binary, so 3 is 0b0011, and -1 in two’s complement is 0b1111. If we do the sum in binary, we get: 0b1100 + 0b0011 = 0b1111, which is the expected result. A more complete explanation can be found in this video.
The octave can take negative values, as the octave and F-number determine the frequency at which the sampled sound is played. This frequency is used to fine-tune the sound. In the next section, we provide a brief technical explanation of how this works.
To conclude the topic of registers, I’ll just mention that the last two registers, 0xF8 and 0xF9, are used to indicate the volume of the FM and wave sound outputs, respectively.
How do I change the sampled sound to another frequency?
In the section "What is a wave signal?", we explained that it is a recording of a sound, similar to a photograph of the sound, but made with many, many small pieces called "samples." Each sample is like a point in a graph that describes how loud or soft the sound is at a specific moment.
Once we have these samples, and we want to turn them back into sound, we use the OPL4 to play them. The samples were captured at a certain sampling rate, for example, 44.1 kHz, which means that for every second, we have 44,100 points representing the sound’s amplitude. But what happens if you want the sound to be lower or higher, like playing a different note on a piano?
This is where the "playback frequency" comes into play. This is like telling the chip how fast it should pass through the samples:
To make the sound higher (a higher note): The chip reads the samples faster. It’s like playing a video in fast motion. This is called oversampling the signal because you are playing the samples more often per second.
To make the sound lower (a lower note): The chip reads the samples more slowly, like playing a video in slow motion. This is called undersampling the signal because you are playing the samples less frequently per second.
This change in speed does not affect the sound quality if done within certain limits, but it allows the same set of samples to be used to generate many different notes, just as you can play many notes on a piano with a single string if you change its tension.
Thus, the chip adjusts the speed at which it reads the samples to create the illusion of a lower or higher sound, allowing you to hear melodies with realistic sound using just one reference recording. However, there comes a point where the scaled sound no longer resembles the original, and then it is a matter of re-recording the sound at the new pitch to be able to transfer it to other frequencies.
Now let’s look at a practical example: Imagine you have a sample of a specific note, for example, an A in the third octave (A3) from a piano, and this sample was recorded at a frequency of 44,100 Hz (this means that 44,100 points of the sound were taken every second). This A has a fundamental frequency of 440 Hz, meaning the main vibration of the sound makes 440 waves per second.
Now, we want to generate other notes from this sample. To achieve this, we simply play the samples at a different speed:
To lower one octave (to A in the second octave, A2), we play the samples at 22,050 Hz, half the original speed. This makes the sound lower because the sound waves move more slowly, and the fundamental frequency drops to 220 Hz.
To raise one octave (to A in the fourth octave, A4), we play the samples at twice the speed, that is, 88,200 Hz. This makes the sound higher because the sound waves move faster, and the fundamental frequency increases to 880 Hz.
To generate an intermediate note (like B just above A3), we need to play the samples at an adjusted speed. For example, B has a fundamental frequency of 493.88 Hz, so we would need to play the samples at a speed 12% faster (approximately 49,388 Hz).
But how can I know how much I need to increase or decrease to achieve a different pitch? That’s where cents come in, a unit of musical measurement that represents 1/100 of a semitone in the equal-tempered scale (the scale used in most modern musical instruments like pianos and synthesizers). Each semitone is made up of 100 cents, so an octave, which consists of 12 semitones, is 1,200 cents.
And how does all this theory affect the OPL4? As we said, the pitch of the sample depends on the octave and the F-Number according to this formula:
F(c) = 1200 * (octava-1) + 1200 * log_2((1024+F-Number)/1024)where F(c) is the number of cents we want to achieve. So, if my sample is at C-3 and I want to raise it to D-3, which is two semitones (F(c) = 200), I would need to set the octave registers to 0 (so we don’t go over), and set the F-Number as follows:
F-Number = 1024 * 2^(F(c)/1200) - 1024 = 125.401Rounding to the nearest integer, we would use F-Number = 125.
How do we load the MSX tone into the OPL4?
The steps to upload our sampled sound to the OPL4 are as follows:
Put the Moonsound in data-receiving mode. We need to set register 0x02, bit 0 to Memory Access Mode, which for Moonsound means setting the value to 0x11.
Write the address where the data will begin to be placed. In Moonsound, the starting address is 0x200000, but there can be a maximum of 127 wave instruments. Therefore, in registers 0x03-0x05, we begin with an offset of 127 * 12 bytes.
Store the bytes and iterate the process. We need to store the data in register 0x06 and wait for the OPL4 to read the byte. There is no "ready" signal; the manual simply states that we should wait 28 master clock cycles before writing again. Once the byte is written, the memory automatically increments by one position, and we just need to write the next value.
Store the wave header. After uploading all the data, we need to write the Wave header, which indicates the starting address of the samples, the format, the length, the loop point, and parameters for formatting the sound. Each header is 12 bytes long. The first 3 bytes indicate the format and initial address, the next 2 bytes are the point in the song where the loop will start, and finally, the last 2 bytes represent the sample length in two's complement (CA2). Why CA2? I’ve been wondering about this, and I concluded that in CA2, you simply add one by one, and when it reaches zero, you've gone through all the bytes. If you were to just store the sample size, you’d need to subtract 1, which would require more resources.
The other 5 bytes (0x07-0x0B) are the configuration parameters for the wave: LFO, VIB, AR, D1R, DL, D2R, Rate correction, RR, and AM. These are the same parameters that you can configure later with registers 0x80-0xF7 once the wave is loaded.
The MIDI 1 format of the YRW801
So far, we’ve studied how to load samples into the OPL4, but Moonsound only allows loading 128 user instruments. What happens to the first 384? Moonsound reads them from the YRW801 chip, which, as explained in call MSX 3 (page 15), is a chip that follows the General MIDI 1 (GM1) format. The distribution of this format can be found thanks to the work done in the Alsa Audio project, where the code yrw801.c is available.
The GM1 standard defines 128 instruments, and as seen in yrw801.c, these instruments are defined with the following structure:
typedef struct opl4_sound {
    unsigned int tone;
    int pitch_offset;
    unsigned char key_scaling;
    char panpot;
    unsigned char vibrato;
    unsigned char tone_attenuate;
    unsigned char volume_factor;
    unsigned char reg_lfo_vibrato;
    unsigned char reg_attack_decay1;
    unsigned char reg_level_decay2;
    unsigned char reg_release_correction;
    unsigned char reg_tremolo;
} opl4_sound_t;

typedef struct opl4_region {
    unsigned char key_min, key_max;
    opl4_sound_t sound;
} opl4_region_t;
For example, the acoustic piano (GM1 instrument number 1) is represented by the following array:
static const opl4_region_t regions_00[] = { /* Acoustic Grand Piano */
    {0x14, 0x27, {0x12c,7474,100,0,0,0x00,0xc8,0x20,0xf2,0x13,0x08,0x0}},
    ...
};
Algorithm to play a MIDI note with Moonsound
The procedure to play a MIDI instrument with Moonsound is as follows:
Select the regions_XX array according to the MIDI instrument (from 0 to 127, where XX is the hexadecimal value of the instrument).
Choose the appropriate region (key_min ≤ note ≤ key_max). According to the note we want to play in MIDI notation, which goes from C in octave 1 (which corresponds to 0) to G in octave 9 (which corresponds to 127).
Calculate the pitch, octave, and F-number:
Pitch: The tonal offset for the MIDI note is calculated as follows:pitch = ((note - 60) << 7) * key_scaling / 100 + (60 << 7) + opl4_sound_t.pitch_offset;
F-number: It is calculated from the hundredths of a semitone (values from 0 to 599) using a correspondence table (ms_wave_pitch_map). This table converts the hundredths value into the corresponding register value for the F-number for the chip.
Octave: It is determined by dividing the pitch by 0x600 (1536 in decimal), subtracting 8 to adjust the scale. For example:octave = pitch / 0x600 - 8;
Assign the values to the corresponding registers: such as tone (to), pan, volume, etc.
Activate the note with bit 7 of register 0x68 + ch.
Program to load samples into Moonsound
Once we've covered all the theory, let’s look at an example where we apply everything we've learned so far. In this program, we will load our sample and play it using the Moonsound. By pressing different keys, we can vary the parameters that shape the waveform of the wave, allowing us to choose the default settings when writing the header to the OPL4. Pressing F and G will play an FM tone. You can find this program on the MoltSXalats GitLab.
As always, we start with including the libraries that we'll use. We define the wait constant to know when the OPL4 is ready, the memory address where we can start writing the samples, and the communication ports of the MSX to interact with the OPL4 registers. Finally, in line 25, there’s the structure that allows the conversion from pitch to octave and F-Number.
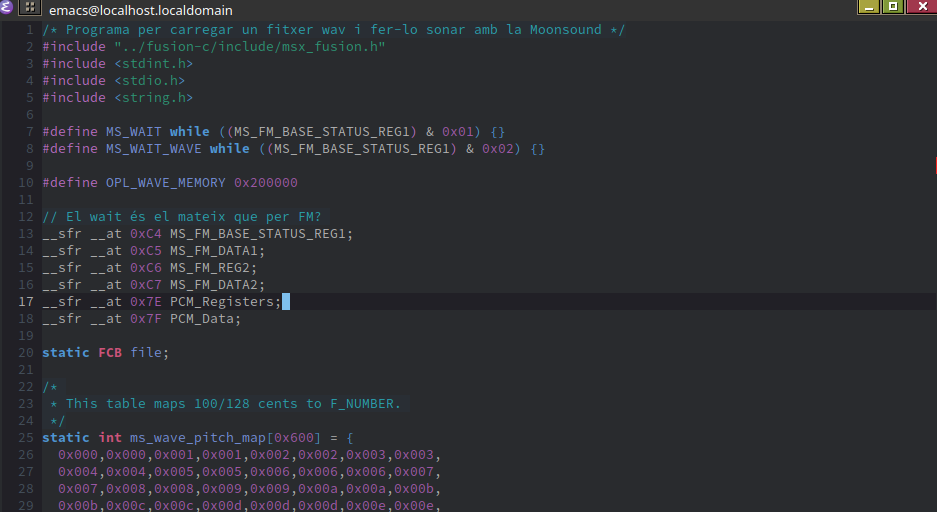
And now we have the same functions that we used in the FM part to write to the Moonsound registers: ms_wave_write, ms_fm1_write, and ms_fm2_write. Starting at line 244, we have the disk access functions that we’ve used several times in these articles: FT_SetName and FT_errorHandler.

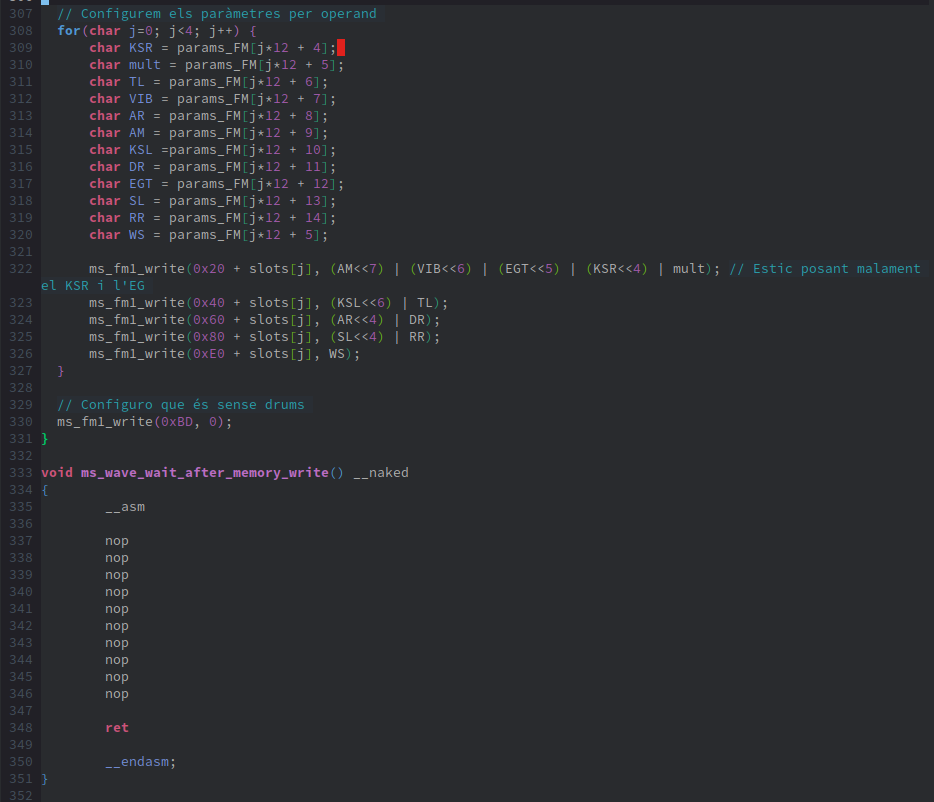
Then, at line 290, we declare the configure_FM_channel function, which will be responsible for configuring the FM channel as explained in the Moonsound FM article.

Next, we have the ms_wave_wait_after_memory_write function, which is a series of nops used as a wait function to allow writing another piece of data to the OPL4 memory register, 0x06.
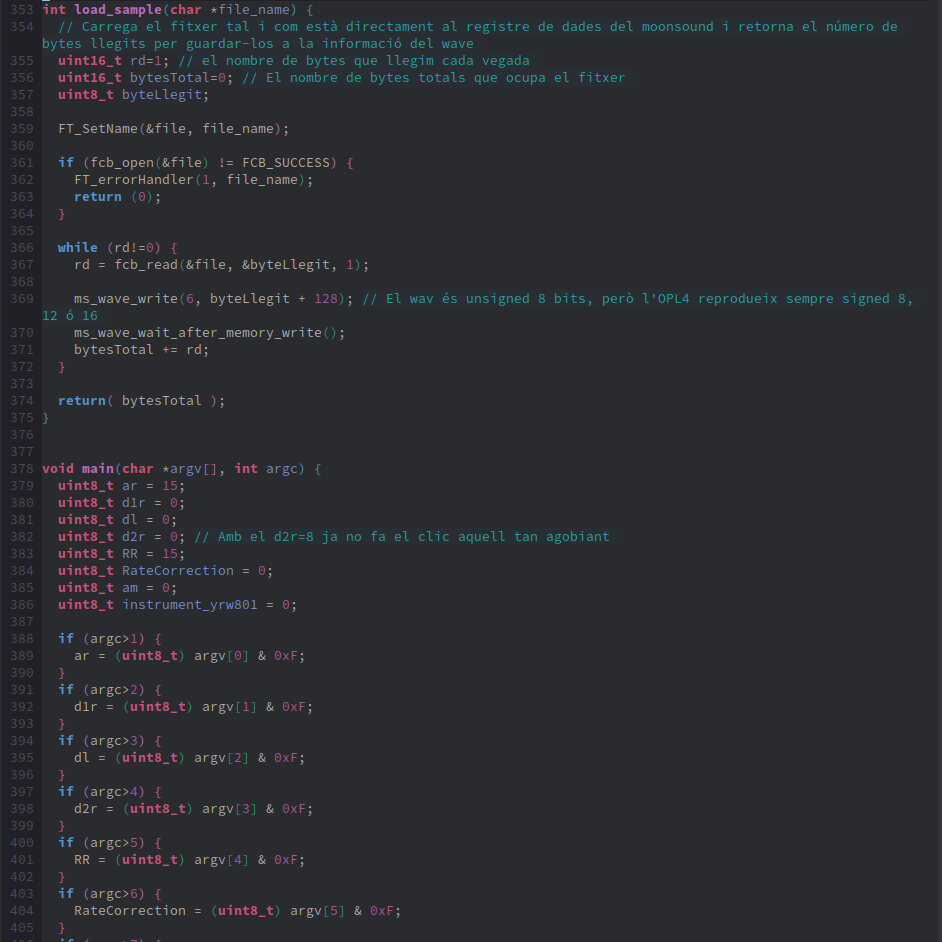
The next function we have is load_sample, which, using the previous functions, is responsible for reading the sample file from the disk and loading it into the OPL4.
Now, let’s describe the main function at line 378. This main function is different from all the others, as until now we hadn't used parameters in the DOS execution line. Now, when we run our program from DOS, we can pass parameters that are used to configure the wave sound on the OPL4. This way, if we want to test different values, we don’t need to recompile the program, just change the parameter value. These parameters allow us to modify ar, d1r, dl, d2r, RR, rate correction, and am. If we don’t provide them all, default values are set, which are defined between lines 379 and 386. The lines following until line 410 are for assigning these command-line parameters to the program.
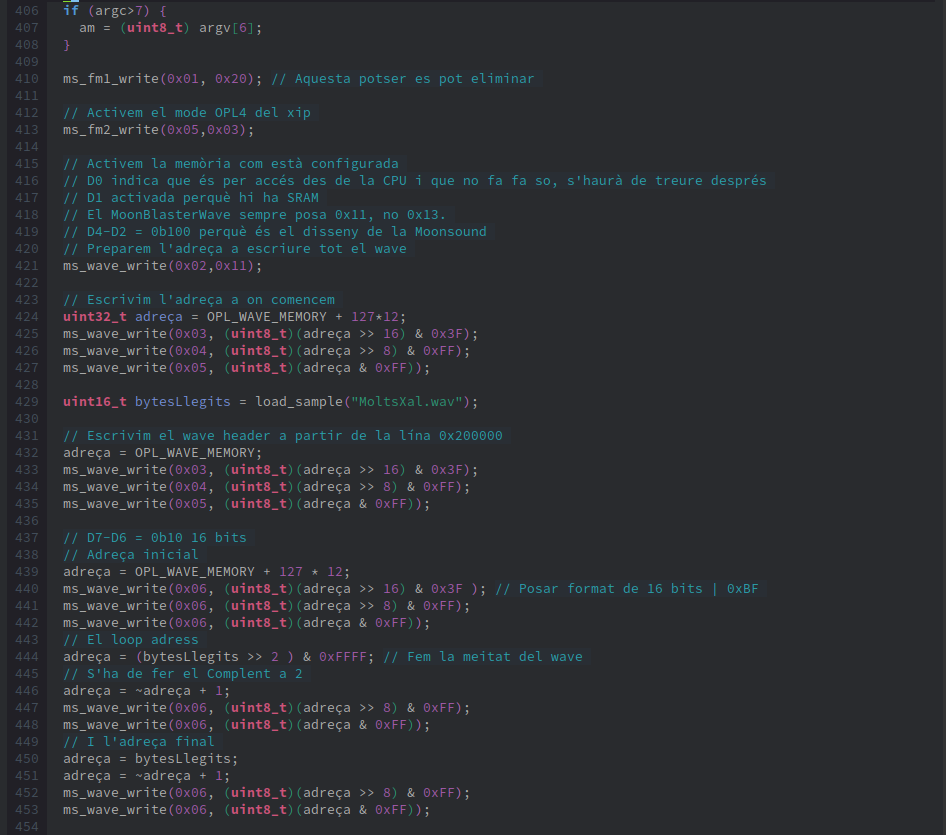
Once we’ve collected all the parameters from the command line, we move on to configuring the Moonsound from lines 410 to 423. Then, we specify where we will start saving the sample data, keeping in mind that the Moonsound allows customizing 128 waves, and that each wave configuration header is 12 bytes, which gives us the information needed to calculate the first available address as done in line 424.
Next, we call the function to read the file from the disk and store the bytes in the Moonsound, load_sample, which returns the file size in bytes. Then we begin writing the header:
Initial address (lines 439-442).
Loop offset, the part that will be repeated (lines 444-448).
Number of samples contained in the sample. In this example, I’ve created a 16-bit audio file, so the number of samples is the number of bytes in the file divided by two. This number must be converted to 2’s complement for storage in the header. The 2’s complement is obtained by inverting all the bits and adding 1 (lines 450-453).
The parameters that define the shape of the wave sound (lines 456-464).
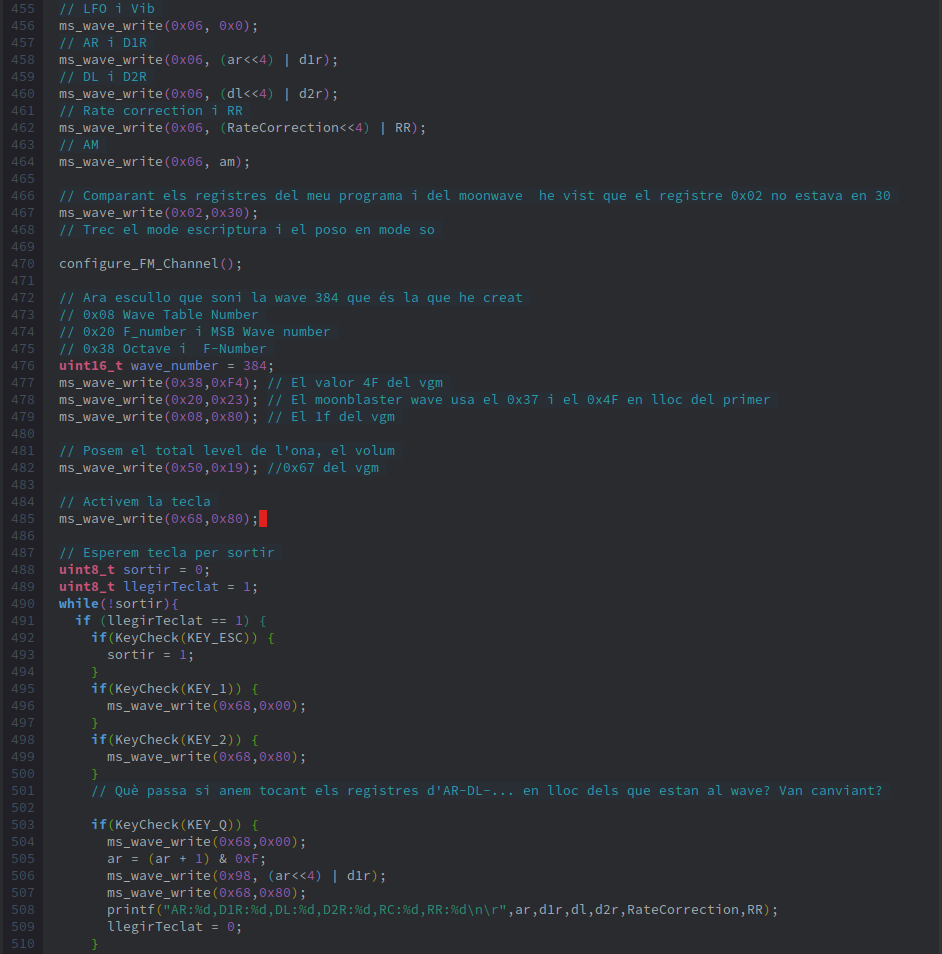
Once we stop writing data to the OPL4, we need to take the Moonsound out of the data-writing mode and switch it to sound playback mode by writing the value 0x30 to register 0x02 (line 467).
Next, in line 470, we configure an FM channel as we did in the FM article. If we only want to play PCM/Wave sound, this step is not necessary. I’ve done it here because I want to test both parts playing simultaneously.
Once the Moonsound is in sound mode, we need to configure the wave part to play the sample we’ve uploaded on one of its 24 channels. The OPL4 documentation specifies that registers should be written in a particular order for the sound to play correctly. The order should be: first the octave with the high part of the F-number (0x38-0x4F), then the F-number with the MSB of the wave number (0x20-0x37), and finally the remaining part of the wave number (0x08-0x1F).
We will use the first channel, so we’ll use registers 0x38, 0x20, and 0x08. In line 476, we define the wave_number, 384 (0x180), but we don't use it since it’s set. The octave we use is 0xF, and the upper part of the F-number is 0b100, so we store the value 0xF4 in register 0x38. The wave number is 0x180, so it has the MSB set to 1, which we add to the remaining F-number 0b0010001, obtaining the value 0x23 in register 0x20. Finally, the lower part of the wave number, 0x80, is written to register 0x08.
In line 482, we choose the Total Level of the wave, and in line 485, we activate the channel, similar to when we pressed the key in the FM part, like pressing play on a CD to start the sound.
In line 488, we define sortir variable, which we’ll use to break the infinite loop, and the llegirTeclat variable, which helps us avoid key bounce (reading the key multiple times when we only want it to count once).
Un cop hem deixat d'escriure dades a l'OPL4, s'ha de treure del mode escriure dades en que es troba el Moonsound al mode reproduir so escrivint al registre 0x02 el valor 0x30 (línia 467).
Després a la línia 470 configurem un canal FM tal com hem fet a l'article FM. Si només volem reproduir so PCM / Wave, això no cal. L'únic que jo ho he fet ja que vull provar de fer sonar les dues parts a la vegada.
Un cop ja tenim el Moonsound en mode so, hem de configurar la part wave perquè en un dels seus 24 canals reprodueix el sample que li hem pujat. Les instruccions de l'OPL4 diuen que els registres s'han d'escriure en un cert ordre perquè soni correctament. L'ordre ha de ser primer l'octava amb la part alta del F-number (0x38-0x4F), el F-number amb el MSB del Wave number (0x20-0x37) i finalment el que queda del wave number (0x08-0x1F).
Nosaltres utilitzarem el primer canal i per això usarem els registres 0x38, 0x20 i 0x08. A la línia 476 definim el wave_number, 384 (0x180) però que no utilizem, ja que ho hem deixat fixat. L'octava que utilitzem és 0xF i l'F-Number superior és el 0b100, per tant al registre 0x38 guardem el valor 0xF4. El wave number és 0x180, per tant té el MSB a 1 que afegirem al que queda del F-Number 0b0010001 obtenint el valor 0x23 al registre 0x20. Finalment la part baixa del wave number, el 0x80 al registre 0x08.
A la línia 482 escollim el Total Level del wave i a la 485 activem el canal, com quan a la part FM apretàvem la tecla, com donar-li al play del CD perquè comenci a sonar.
A la línia 488 definim la variable sortir que l'utilitzarem per sortir del bucle infinit i la variable llegirTeclat que la farem servir per evitar rebots de lectura del teclat (llegir més d'una vegada el valor de la tecla, quan voldríem que només comptés com una sola vegada).
Les línies següents van mirant al teclat si hi ha la tecla apretada i si és així fan una acció pertinent. Les tecles són:
ESC: Per acabar el bucle
1: Apaguem el so del wave perquè deixi d'escoltar-se, ja que l'hem iniciat abans i com que té loop sempre estarà sonant.
2: Tornem a activar la reproducció dels samples.
Q: Puja el valor del paràmetre AR.
The following lines check the keyboard to see if a key is pressed, and if so, perform the appropriate action. The keys are:
ESC: To end the loop.
1: Turns off the wave sound so it stops playing since we started it earlier, and because it has a loop, it would keep playing indefinitely.
2: Reactivates the sample playback.
Q: Increases the value of the AR parameter.
W: Increases the value of the D1R parameter.
E: Increases the value of the DL parameter.
R: Increases the value of the D2R parameter.
T: Increases the value of the Rate Correction parameter.
Y: Increases the value of the RR parameter.
F: Plays an FM note.

G: Stops playing the FM note.
K: Plays a note from a sample sound of the YRW801.
L: Stops playing the note of the sampled sound triggered with the K key.

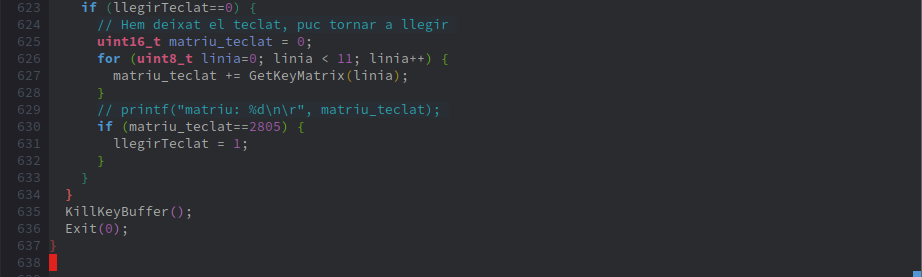
Finally, the code to control key debouncing: We check that all lines of the keyboard matrix are deactivated. If that's the case, we can read the keyboard again.
In line 635, we clear the buffer in case any key character is still pressed and exit the application with Exit(0).
Since this program uses parameters received from MSX-DOS, it needs to be compiled differently. The initialization point, crt0, must be changed, choosing in this case crt0_msxdos_advanced.rel. The command is:
sdcc -V --code-loc 0x180 --data-loc 0x0 --disable-warning 196 -mz80 --no-std-crt0 --opt-code-size fusion-DOS.lib -L ./fusion-c/lib/ -I ./fusion-c/include/ ./fusion-c/lib/crt0_msxdos_advanced.rel -o learning-fusion-c-programs/learning-fusion-c-programs/loadwav.ihx learning-fusion-c-programs/loadwav_arg.cConclusions
In this article, we reviewed the theory of sampling in order to understand what we are doing when loading a sample into the Moonsound. We introduced the registers and basic operations of the OPL4 to achieve sample playback. We also briefly discussed the MIDI1 standard so that we could play the sounds found in the YRW801.
Unfortunately, webMSX does not have the PCM/Wave part implemented in the OPL4 emulation. Therefore, we are only providing the prepared DSK to be used with openMSX. Don't forget to install the Moonsound extension on your preferred emulated computer. In my case, it would be:
~/MSX/openMSX/derived/openmsx -machine Panasonic_FS-A1ST -ext moonsound -diska ~/MSX/Fusion-C\ 2.0\ SDK\ pre-beta\ 2b/WorkingFolder/out/dska/ Turn up the volume, sit down, and listen to the sample we’ve prepared for you, which will play when you run loadwav.com on the DSK you'll find here.


Comments